General settings/lens setups on your camera?

Joined
Aug 27, 2009
Messages
197
While chasing there seems to be somewhat similar photo setups that occur from time to time. I am curious to how you set up your camera while chasing.

- If you shoot in Manual mode (which I assume), do you typically tend to keep the Aperture fixed and regulate with the Shutter speed.
- Do you typically use auto ISO or alternate that?
- How do you handle the "10 sec opportunity windows", when something appears and you know you have very limited time to photograph? Fully automatic.
- Do you have a standard Aperture that you tend to keep it on, unless the situation is very specific?
- How do you do to get the most contrast out of a dark (non back-lit) tornado? For example: - How can one practice storm photography when there is no storms?

Personally, I try to get out of the car with two cameras when there is a chance of tornadoes. On one, I keep some sort of telescope lens, either 70-300mm or 18-230mm on my Canon 760 (cropped sensor), on the other I have my old Canon 460 with a wide angle lens for storm structure. If we are close to the base, I sometimes use the wide angle as my primary lens and switch the 18-230 to my secondary camera. I usually keep my camera settings to Av-mode with auto-ISO unless there is plenty of time to play around with camera settings. I have messed up several times by forgetting my camera on a fixed ISO, fixed manual focus etc and haven't realized until too late which has ruined some great photo ops for me. I still don't feel comfortable enough to go full Manual, mainly for that reason and because it would take too much time for me to find the perfect setup when time is scarce.

What is your personal strategy for photographing storms?
 
- If you shoot in Manual mode (which I assume), do you typically tend to keep the Aperture fixed and regulate with the Shutter speed.
- Do you typically use auto ISO or alternate that?
- How do you handle the "10 sec opportunity windows", when something appears and you know you have very limited time to photograph? Fully automatic.
- Do you have a standard Aperture that you tend to keep it on, unless the situation is very specific?
- How do you do to get the most contrast out of a dark (non back-lit) tornado? For example: - How can one practice storm photography when there is no storms?

Assuming you don't have the gobs of money needed to have multiple cameras ready with fixed settings...

-I shoot in full manual most of the time, which means I alternate the exposure time and aperture as I see fit. Frankly, I think if you want to be even halfway decent at photography you need to learn how to alternate both of these quickly and on the fly. Nikon's have rotating dials that you can control with the fingers on your right hand and maybe a separate button you can hold down with your left hand to control whether the dial switches the exposure speed or the aperture setting (when there is only one rotating dial present...that was the case with the D40...my D750 has two separate dials). During daylight chasing, the cameras will give you some leeway on not having the perfect exposure and aperture settings, so it is not particularly critical to get these exactly right. But in general you want to adjust these to get as fast a shutter speed as possible while still allowing enough light into the camera so as not to underexpose. That tends to mean low F-stops (open aperture). I only tend to get above F/8 or so when there is very good light. ....Oh, and to get the most out of this...you should use manual focus at infinity. You should really never have a reason to have to focus at any other distance.

-I use as low of ISO as reasonably possible. 100-200 works very well. On higher end cameras you can get away with 1000-2000. But I would only turn it up when light starts to become a premium (either lots of clouds blocking the sun or towards sunset).

-There is no way to be ready for super short windows other than to have your camera in hand and turned on and watching the sky.

-Lower F stops are preferred in many cases so as to allow for faster shutter speeds. However, this is at the cost of depth of focus, meaning your focus is less forgiving. If there is enough light so that you can use a much higher F-number (like 15 or above), the depth of focus increases quite a bit which allows for more forgiveness with incorrect focus.

-Try to keep the sun's disc as far removed from the feature you are shooting as possible, so as to reduce overexposed sections adjacent to dark sections. You can also try shooting HDR.

-Shoot on days with cumulus humilis (i.e., fair-weather puffy cumulus). Those days are plentiful in the warm season. Also, shoot in the afternoon when you would be otherwise chasing.
 
Thanks for some really good feedback! Yeah, it is somewhat embarrassing that I don't shoot in Manual mode considering the money I have spent on cameras so far. I have been a bit too bummed out about mistakes I have made in the past, leaving me not trusting my ability as a photographer in those cases.

This season I will have a Canon 6D with a 16-34mm lens (mainly for structure & lightning) as well as my Canon 760 for more distance photos as well as video. I have a fixed 50mm and a 70-300mm that goes on both. I am somewhat considering a 24-70mm for the Canon 6D as I am buying the 6D used, allowing for some extra budget here.

Some follow up questions:

- I assume then you keep your ISO fixed and change it while needed? I.e. not in "Auto".
- Similarly, do you tend to keep your lenses on Manual, and only shift to Auto-Focus when needed?
- I am a bit suprised that you "optimize" in shutter-speed. I can understand that for a tornado photo when it is lit enough so that you can stop it in the motion, so to say. Otherwise, the motion never really seems to be fast enough that shutter speed is an issue, but rather getting as much of the details in focus as possible i.e. optimizing on high aperture.

Given my photo from Cope, CO, which is a tornado view I usually find myself most in. Do you think there would have been any camera setting that would have made the tornado less "flat", you think?
 
Thanks for some really good feedback! Yeah, it is somewhat embarrassing that I don't shoot in Manual mode considering the money I have spent on cameras so far. I have been a bit too bummed out about mistakes I have made in the past, leaving me not trusting my ability as a photographer in those cases.

Another part of the reason for using manual focus is that auto focus mechanisms can have a hard time focusing on wispy elements such as clouds, so even with autofocus you may not get great results. With manual focus you are assuring yourself of having correct focus.

ChristofferB said:
This season I will have a Canon 6D with a 16-34mm lens (mainly for structure & lightning) as well as my Canon 760 for more distance photos as well as video. I have a fixed 50mm and a 70-300mm that goes on both. I am somewhat considering a 24-70mm for the Canon 6D as I am buying the 6D used, allowing for some extra budget here.

Some follow up questions:

- I assume then you keep your ISO fixed and change it while needed? I.e. not in "Auto".
When you shoot in manual modes on a Nikon, it by definition keeps your ISO fixed unless you change it. When in auto modes, it will adjust as it deems necessary. So, yes, I keep my ISO fixed.

- Similarly, do you tend to keep your lenses on Manual, and only shift to Auto-Focus when needed?

yes

- I am a bit suprised that you "optimize" in shutter-speed. I can understand that for a tornado photo when it is lit enough so that you can stop it in the motion, so to say. Otherwise, the motion never really seems to be fast enough that shutter speed is an issue, but rather getting as much of the details in focus as possible i.e. optimizing on high aperture.

I am not a professional photographer, but I do understand the basics and have experience. This is only my personal preference, and it is just an opinion. There is more than one way to prioritize your settings, and they are equally as valid. IMO, if you focus accurately enough, then the aperture setting really doesn't matter that much. I have had more than a few otherwise decent shots ruined by camera motion blur (i.e., my hand not holding the camera steady enough) when using slower shutter speeds (generally slower than 1/100 s), so that is my rationale for wanting fast speeds. It can get really hard to stay faster than 1/100 s when you're deep into a supercell and anvil shading has completely eliminated background sunlight...and it's close to 00Z.

Given my photo from Cope, CO, which is a tornado view I usually find myself most in. Do you think there would have been any camera setting that would have made the tornado less "flat", you think?

I don't know for sure, but given there was some significant distance between you and the tornado, and the terrain around there is very flat (I was there that day, too) I would say probably not. That shot is more the result of chase positioning than camera settings or framing.
 
Thanks Jeff for a lot of really good answers! I will try to see if I can simulate storm chasing back home in order to practice what you have mentioned!
 
-Lower F stops are preferred in many cases so as to allow for faster shutter speeds. However, this is at the cost of depth of focus, meaning your focus is less forgiving. If there is enough light so that you can use a much higher F-number (like 15 or above), the depth of focus increases quite a bit which allows for more forgiveness with incorrect focus.
I think this is great information.
 
Stopping down a lot does increase your depth of field, but at the cost of diffraction which limits overall resolution. Where the precise diffraction limit is depends on your sensor, but I don't like to stop down beyond f/8, or f/11 on ultra-wide zooms which need it.

As for the original question, my Nikon bodies have auto-ISO with a minimum shutter speed that is determined by the focal length (e.g. 1/focal length). So I usually just shoot in aperture priority with the auto-ISO, at the aforementioned "landscape apertures". If light is getting low or there is a tricky situation, then I will open up the aperture or switch to manual entirely. One body always has a 24-70 mounted, while the other gets either a 70-200 or 12-24 as needed. Despite having two bodies, I've still found that the correct lens for any given situation is always the one that's not currently mounted -- or, if I'm holding only one of the bodies in a time-critical situation, then it's always the other one that I need.
 
Manual mode is overrated in my opinion. You need it sometimes, especially when the metering isn’t working correctly due to the scene being a bit weird, or when shooting timelapse, but it makes me chuckle when people spend $4K for a camera that has state of the art matrix metering and then choose to shut all that stuff off. If I’m shooting 6x7 film on a 30 year old body, I set it to manual based on a hand held meter because the in-camera spot metering probably sucks or requires pointing at a bunch of
shadows and highlights and doing some mental calculations. But a high end camera made within the last five years? Let the engineering that went into that thing help you.

Generally I like to shoot aperture priority for storms, with the lens wide open once it gets dark. If it gets actiony (people shots, shots out the window of a moving car, etc), I switch to shutter priority and pick a fast shutter speed (relative to how fast I think things might movie) to make sure nothing gets blurry. I leave iso selection to auto, unless it’s fairly bright outside, then I lock it to 100ISO.

Seriously, there is no shame in using aperture or shutter priority with auto ISO. There are some shots you just won’t get if you have to fiddle-fart around with with manual settings. That said, if you know you will be taking a photo of a scene that has a fairly static exposure, by all means remove potential for metering error by locking the exposure down manually. This can help with those 10 second opportunity windows, too, if you know the exposure in advance and the potential scenario that might happen. This was shot out the front windscreen with one hand while going 60mph, and it only worked because I preloaded the manual exposure camera settings for the sky assuming I might need some extra shutter speed to eliminate motion blur.

I do like two bodies, but one of them is getting long in the tooth (50D) so I often find myself shooting just with the newer body (6D) and switching lenses as needed. It’s usually pretty obvious when you will be shooting structure vs tornado closeups, so this isn’t as bad as it sounds.

Oh - and shoot RAW! My god, shoot RAW. Learn how to post-process (Lightroom is best for this). So much of good photography happens after you take the photo, and so much more is possible if you shoot RAW.
On my next chase, I will try setting my camera settings to the aperture and shutter setting. During one of my chases, I had a very blurry photo of a weak tornado. I ended up pulling out my phone to ensure I got a decent photo of the tornado. If did not use my phone, I would have missed that 10 second window time frame. I also wonder about using auto mode during some instances but afraid the photo may not come out very good.
 
When in tornado chase mode, I use ISO 400 on aperture priority mode at F5.6 with the lens at infinity. I find that the biggest challenge with tornadoes is getting a sharp image, since 99 percent of the time you have to handhold the shots. Faster lens also helps, my Canon 50mm f1.8 lens is my favorite for tornadoes. Going above 400 ISO helps in lower light, but you’ll start getting worse noise in the image.

For lightning I use manual mode at iso 100, aperture depends on how close the lightning is: f5.6 for distant to F10 or smaller for close bolts. Exposure time depends on ambient light: 8-10 seconds for cities at night, 25-30 seconds or bulb with no close artificial lights in the frame. 2 to 6 seconds for lighter twilight.
 
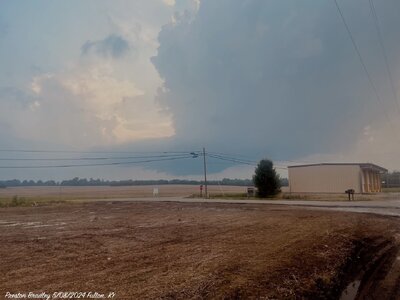
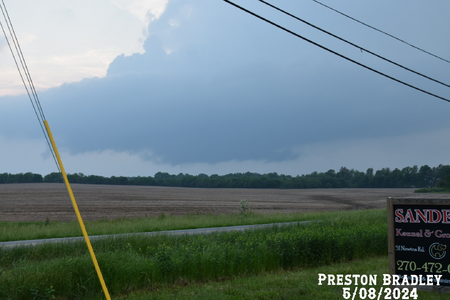
Here are some pictures, I took yesterday when I was chasing. I managed to get some decent shots with the aperture and shutter settings. I am still learning and have a long way to go before I consider myself intermediate or even professional. I am hoping to get more practice in the coming days.
 

Attachments

  • IMG_6947.jpeg
    IMG_6947.jpeg
    195.3 KB · Views: 5
  • wallcloudfultonky050582024.png
    wallcloudfultonky050582024.png
    1.7 MB · Views: 4
I do pretty much the same as Dan for lightning. In general chasing, if I have time I shoot some full auto and some full manual, usually somewhere between F/5.6 and F/11, using the meter to adjust shutter speed as needed. If I need to get a shot quickly, I just use auto, and usually can get a decent shot through post-processing. If there is time, though, I can often get a better shot using manual settings, especially in bright and/or high contrast situations. At 74 my vision is not good enough to use manual focus; I will ALWAYS get better results (but not necessarily perfect) using auto-focus.
 
I always shoot on full manual. I wouldn't say I have any go-to settings when it comes to storms, as the light is constantly changing. Generally, you can set your aperture as wide open as it'll go to get the most light in. No real concerns about depth of field, unless you've got a foreground object you're integrating into the frame. I always put my focus area on the very bottom so that I can focus on the horizon. I try to keep the shutter speed as fast as I can get away with. I looked at the technical stats for my camera, and at ISO 400 there's a dip in noise level, almost as low as ISO 100. So if I need anything more than 100, I just go straight to 400. My camera is pretty solid with higher ISO values as well, and the new Lightroom AI denoise is impressive, so I could probably get away with up to ISO 1600, but I try to avoid that. In darker storms I may go as low as 1/30 on shutter speed. I keep stabilization on, which I believe gives me 5 stops.

If you want good practice at quickly changing your settings, shoot wildlife! Especially faster moving animals that live in areas with shade. It requires constantly changing your settings as they move around in different light, and typically this is early in the morning, when animals are most active.
 
A 5-year-later update on my shooting strategy. The caveat is that I now shoot with a Nikon D750 rather than a D40. I think the camera technology itself matters. The ISO setting on my D40 didn't go above 1600, and shots at that setting looked quite grainy, whereas on my D750, a 1600 ISO looks much cleaner.
  • I still prefer to keep my exposure time shorter than 1/200 s, and will adjust aperture and ISO to maintain that. I always seem to get bit by blurriness if I drop below 200 (i.e., exposure time increases above 1/200 s). Hand not steady enough and enough wind to take the crispness out of the image.
  • My go-to point for ISO is 200, but I'm willing to go up to 800 or so in darker conditions. I had to adjust up to 1000 late in my chase in CO on Monday, and the graininess even at that level shows for sure despite the gain in brightness.
  • I usually find myself shooting with the widest aperture (F/2.8 for wide angle, F/4ish for kit lens), again, in the spirit of maintaining a fast shutter speed, but that can occasionally backfire with slightly fuzzy shots if I'm not on auto-focus. So I'll try to stop down to F/5.6 or so if I remember to think about that. Another option is to burst shoot while slowly turning the focus knob over a narrow range and picking the best looking one after downloading the images to my computer where I can view the shots on a much larger screen.
  • I prefer to underexpose rather than overexpose shots. Seems to me like it's easier to "rescue" an underexposed shot compared to an overexposed one.
 
That's one area where newer cameras really excel at - low-light performance. Having to worry about ISO so much is becoming more of a thing of the past. Especially with Denoise in Lightroom, it can take an ISO 6400 image and clean it up real nicely if the photo is too grainy for your liking.
 
That's one area where newer cameras really excel at - low-light performance. Having to worry about ISO so much is becoming more of a thing of the past. Especially with Denoise in Lightroom, it can take an ISO 6400 image and clean it up real nicely if the photo is too grainy for your liking.
True. And my D750 also has multiple noise reduction settings that essentially denoise shots immediately upon capture. I have tended not to use them out of fear of feeling like I'm pre-"post"-processing my images (before they even come off the camera's card), but perhaps I should let go of that.
 
True. And my D750 also has multiple noise reduction settings that essentially denoise shots immediately upon capture. I have tended not to use them out of fear of feeling like I'm pre-"post"-processing my images (before they even come off the camera's card), but perhaps I should let go of that.

If you shoot JPEG, then it will utilize any noise reduction settings turned on in the camera. Raw will bypass any in-camera processing and that's where post-processing comes into play.
 
I see this thread from a ways back revived.

I'd like to chime in and suggest everyone learn to shoot full manual even on a phone (except autofocus in some scenarios) with in camera denoise and corrections off, and ALWAYS store in RAW if available. I vehemently disagree that auto mode is as good or better than telling the camera what you really want. Full auto mode has no idea what you are trying to capture and will fail as often as not to capture what you think you are getting. There is no shame in using auto until you learn or in scenarios where it may not matter, but it severely limits getting the best images. Relying on fixed settings will always fall short because light and distance and rate of change of things we are trying to capture is always changing. Forcing the camera to guess a combo of settings that yields perfect amount of light (exposure) is too unpredictable. Cameras have no idea if you want to freeze motion first, have perfect depth of field, etc.

JPEG should be avoided as it has everything baked into it from the camera correction settings and cannot be fixed. RAW retains original sensor capture data and can recover highlights or shadows, change white balance, and still correct distortion or noise later, as well as having much more resilience when editing in post before pixelation and artifacts occur. Warning: some things are baked into the RAW file like in camera denoise, which may lose detail, and also causes delay in processing so you cannot shoot quickly between longer exposures.

The 3 exposure controls to learn are quite simple, and they each have one primary function and secondarily affect amount of light gathered. If you change one of these 3 settings up or down an exposure increment, another must be moved up or down the same amount in the opposite direction to have the same amount of light gathered. You really only need to learn these 3 settings, plus focusing, and shoot in RAW to open a world of better images. It is much simpler than it seems. I fumble a lot in the field and I still managed to mostly master these, so anyone can learn:

Aperture controls depth of field (how much near to far is in focus) but also affects how much light is gathered. If you want a close object and far object both in focus, you increase aperture until they are- a higher F number setting narrows the aperture opening producing more depth of field. If you want maximum light gathering or intentional shallow depth of field, set aperture F number as low as possible for a given lens. Some lenses open to F4, others to F2.8, 2, 1.4, etc. The smaller the F number of the lens aperture the more light a lens can collect. These low F number lenses are also called fast lenses due to how fast they collect light, and you want one for chasing. F2.8 or faster wide as possible lens suggested if you can fit into your budget.

Shutter speed should be set to freeze motion sufficiently (if there is any in scene) while still gathering enough light. Unless you are intentionally trying to capture lightning or some other effect where long exposure time is needed, shoot as fast as able while not darkening the scene too much. For example if you are moving in a car, you have no choice to avoid total blur of near objects: you need to shoot at least 1/500 or faster to freeze that scene. If you are handheld standing, you only need to shoot around 1/100s generally to not have blur from your hands shaking imperceptibly - some newer systems can shoot slower shutters handheld with stabilizer features in camera or lens. If you want to freeze fast cloud updraft or rotational motion for example, you need to have a shutter faster than probably 1/8 sec to get crisp cloud edges rather than motion blurred clouds. If you want to brighten a scene that is too dark, or get lightning, or blur water surface to look smooth - slower shutter speed until you get what you want.

ISO adjust the sensor amplifier effectively increasing the apparent light gathered, similar to film speed of old. Always set this last, always. Adjust it only as high as needed for proper exposure brightness without going so high that the image is a noisy mess. On newer cameras, acceptable images are had from 3200-6400 and beyond. For cleaner images around storms, if able try to stay below ISO 1600 - the lower the better. Older cameras perform worse but the general rule is the same: low ISO=low noise, you always want that. However, be willing to adjust upward to keep your other two exposure settings as needed for depth of field and motion capture, and don't be afraid of mid or high ISO - software cleanup is amazing these days.

The last thing to learn is how to balance these 3 controls when conditions are not ideal, such as slight trade-offs between them. Or, you can take multiple images at different settings and blend in software but that is an advanced procedure and not needed so often with todays cameras.

Focusing I will add that focusing is another fourth thing to learn for great images. For perfect focus you have to have the depth of field (aperture) number high enough, and also get your focus point right. Setting up your camera with joystick, arrow buttons, or touch screen (whatever your model supports) to move a central focus point or group of points manually to where you want is essential. It is really easy to learn with just a bit of setup that you do only one time, and a bit of practice before it is second nature. For example, I want distant lightning and supercell in perfect focus. I choose a distant light pole and place my autofocus point on it. If there is enough light, the autofocus does my work for me. If not, I can go to manual focus, zoom in on live view, and get perfect focus, and then leave the lens on that perfect focus until I change subjects and have to refocus. If this sounds hard, autofocus is pretty good until it gets dark these days, so don't worry. However, you want to tell the camera what is important to be in focus. Just praying and spraying with most autofocus unconfigure with many dozens of focus points is likely to get something blurry.

Tripods are essential for long exposure success or timelapse. They certainly are not required for sharp good images, but they can help and give you latitude to slow down shutter speed, reduce camera shake, etc. A nice heavy one with a quick release ball head is the best for storm chasing where you need to get setup quick. I leave my camera on tripod, partially extended in the back seat (pillow for it to rest on) and yank it out fast when needed). Set height not for your comfort, but for how you want objects to relate in the image. Get low, get high, be creative!

I have to re-emphasize, give a few outings not under pressure (dedicate a weekend trip to the lake or something) to learning these controls and basics, it really is not hard and will empower you. Anyone can do it, and it will become second nature. Knowing these will apply to so many cameras, and flows into video camera use and also opens up editing possibilities. You will get much better results for years to come by putting in the time and not letting manual mode intimidate.

Editing is a vast topic I will not get into here, but contrast, fine to coarse detail, white balance, color, dust and spot removal, and so much more is all possible to be done in post. That is for another thread.

For anyone who feels manual settings and taking control is not worth it or intimidating, I assure you it IS worth it and not hard to learn, just takes time. You might have to make a couple one time settings in your camera to make it easier. Many cameras let you make scenarios of settings and save those to be recalled as a preset very fast. I am happy to give anyone suggested specific settings for various scenarios if you have them, ether here or message me. I always enjoy learning from other or talking photo stuff. I'm still in the middle of my own photo journey and have a ton to learn too.

I will end this opinion/persuasion piece for taking control of your camera with a few examples of images I likely could not have gotten just right in any partial or full auto mode. I am not trying to showcase my stuff here; Hopefully you can see the balancing act in each image that was done over freezing motion (shutter) in scene, aperture (depth of field and light gathering), ISO (amplifier recovering brightness at expense of noise).
441354136_10100693552972288_6519665347087835327_n.jpg
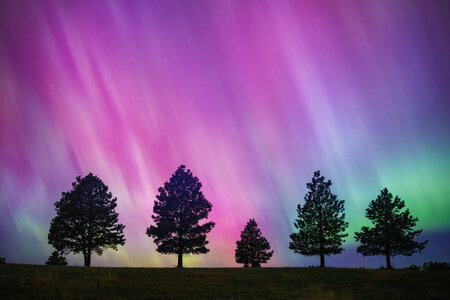
Distant aurora and stars, had to make sure that and trees were in focus, with aperture wide enough to capture enough aurora light. F2.2 for depth of field, 3 seconds shutter to gather some light without too much aurora blur, ISO 1600 to recover some light at trade of noise that was easily cleaned in post. Focus was on star manually for infinite focus, and checked that depth of field was enough for trees to also be in focus at F2.2; it was.
13173492_10100181784191028_1175661732796209431_o.jpg
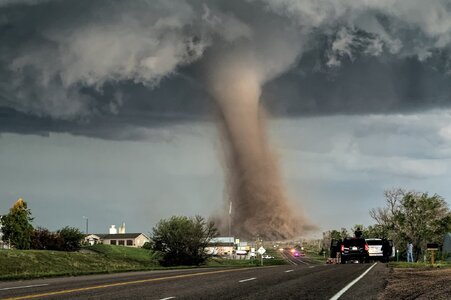
To avoid a blurry mess, shutter speed of 1/100 for this hand held shot. It was dark under the meso, so ISO was 800 or 1600 I believe. Aperture was F5.6 with focused point set on the hard edges in the distance since nothing close was requiring more depth of field.
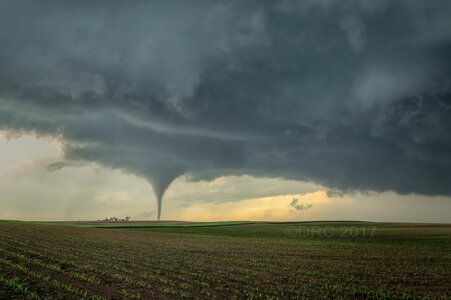
19095512_10100272291039578_4689263812331045369_o.jpg
To get close crop rows and tornado in focus, set aperture first at F8 for depth of tield. Then set shutter to ~1/60 (tripod) and ISO was around 400 or 640. Focus point manually set on the farm at effectively infinity.
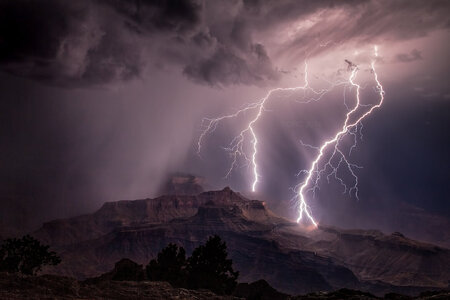
230400549_10100557939587598_3299567557959108428_n.jpg
8 second exposure to get some foreground to illuminate enough during flashes and capture two strikes. Aperture was F8 to avoid lightning blowouts (less light, smaller hole) and to keep close bushes and far rocks in focus. Focus point was set manually on a distant object and autofocus then disabled for this series of shots, so that all shots at similar distance are in perfect near and far focus.
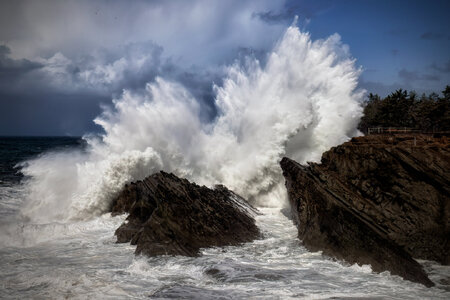
416043773_10100679875412228_406408598611566845_n.jpg
To get wave motion smooth but not blurry, I first set shutter to 1/25 sec. Then Aperture was F4 since nothing was too close- I did not need much depth of field. ISO was daytime so around 1/100. Focus point was the hard edges of the fence and rocks, and not on something moving like water which would confuse autofocus.
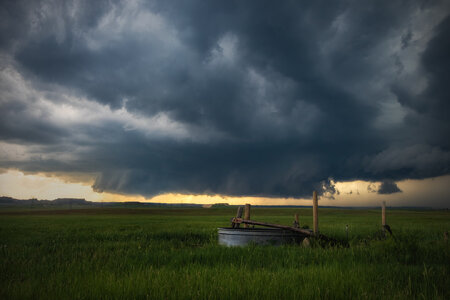
356112493_10100656124174898_6381301374915549404_n.jpg
Close and far objects and I wanted both in focus. Upped F stop to F8 for depth of field, boosted ISO to 400. No fast motion so shutter was able to be slower and recover some light lost with the F8 setting, without boosting ISO and costing more noise.
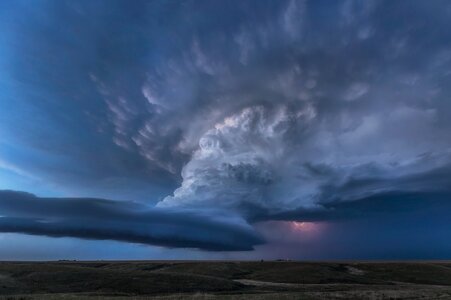
287468266_10100593515802578_4173487077965645501_n.jpg
Here nothing was close so wide open aperture on a 14mm F2 lens was fine for shallower depth of field as long as I focused first on the farm in the distance. I then disabled autofocus since I was on a tripod and not changing distance to subject. However, rotation motion was fast on the updraft and blurred easily until I set to around 1/10sec. Had to boost ISO to 1600 to recover light from the faster shutter as the scene was really darkening at blue hour, and I needed the light recovery even with the cost of noise.


I hope this helps someone! If not, apologies for the long winded post.
 
Last edited:
Back
Top